Add and organize panels
Find the panel picker, identify header controls, dock tools, and open the correct menu.
A panel is one tool inside a workspace: for example, Chart, Watchlist, Positions, or Market Map. Start by opening a tool, then choose its market and adjust its view. You can keep several tools together and save the arrangement in a workspace (see Workspaces and layouts).
Find the panel picker
The PANELS button is at the upper left of the workspace, directly below the main top bar and immediately before the workspace tabs. It has a small grid-and-plus icon. The screenshot shows both the button and the picker it opens.
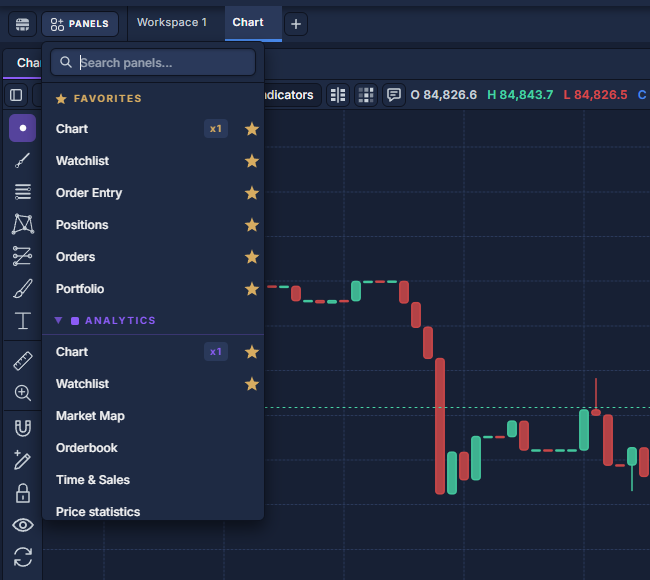
- Click PANELS.
- Type the tool's name into Search panels…, or expand its category and scroll through the list.
- Click the name to add the panel to the active workspace. Clicking a star instead changes its favorite status.
- Select the star beside frequently used tools. They then appear in Favorites at the top of the picker.
- Click outside the picker to dismiss it when you do not want to add anything.
Recognize the panel header
The top line belongs to the panel itself. Its title is on the left; controls are on the right. A market-based panel such as Chart also shows its selected instrument there. The toolbar below the header belongs to that tool: Chart's timeframe and drawing controls are different from table headings or a DOM ladder.

Open settings, Help and other panel actions
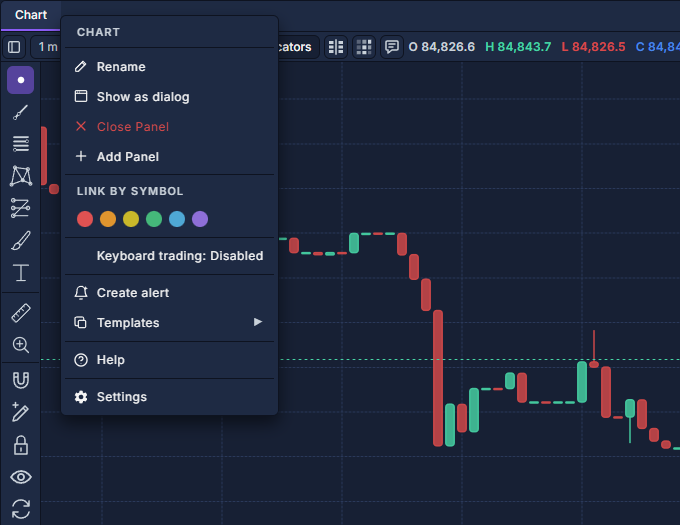
Right-click the title strip, or click the three dots at its far right. This opens the panel menu shown below. Right-clicking a table column opens a different menu for that column; Work with data grids illustrates the difference.
Arrange the workspace
Drag the panel's title strip to move it. During the drag, use the docking targets to place it beside another panel or into a tab group. Release on the intended target, then drag the divider between panels to change their relative size. A tab group shares one screen area; click its tab to bring a panel forward.
Use a wide area for charts and tables, and a narrow vertical area for an order ladder. Collapse a panel when you temporarily need the space; expand it to continue. Hidden panels retain their working state. Closing a panel removes that view, so save useful preferences with Reuse panel settings before rebuilding an arrangement.